#JustSysadminThings
Things I wanna document that isn't related to any specific server setup I have.
- Scripts / Configs
- Helper script for acme.sh
- Script for installing/prepping nginx
- Hetzner - Using iGPU for Hardware Acceleration
- Docker: VPN with Port Forwarding (WireGuard) & qBitTorrent
- HostHatch: Private Networking and Broken IPv6
- Supermicro IPMI & Samba/Windows share
- MinIO Server - Docker Compose & NGINX reverse proxy
- Software RAID (mdadm) - Running RAID 0 alongside RAID 1
- Gameservers
Scripts / Configs
Miscellaneous scripts / configs I've premade in the past.
Helper script for acme.sh
Helper script for acme.sh
acme.sh is a client for generating Let's Encrypt certificates.
Certbot is a great alternative, but I've just stuck to what I know (hence why this exists).
This wiki page will just be backup for a GitHub Gist I've made: https://gist.github.com/Decicus/93d698347cf600af5ea822870eeef54c
GitHub Gist is also mirrored to my personal Gitea instance.
Script by default attempts to install certs into /srv/ssl using Let's Encrypt.
You can pass --buypass when executing the script to use BuyPass Go SSL instead.
Script was last updated April 30th, 2021. A newer version might be available via GitHub Gist.
#!/bin/bash

# Make sure to load environment variables.
. ~/.bashrc

ACME_DIR="/root/.acme.sh"
ACME="${ACME_DIR}/acme.sh --force"
BASE="/srv/ssl"
ECHO_PREFIX="[acme.sh Helper Script]"

CMD_PARAMS="$@";

# Check if we should use BuyPass instead of Let's Encrypt
# as the certificate authority for this certificate.
BUYPASS=0;
if [[ "${CMD_PARAMS}" =~ "--buypass" ]]; then
    BUYPASS=1;
    echo "${ECHO_PREFIX} '--buypass' specified - Using BuyPass CA (Go SSL)."
fi

# BuyPass requires a valid email to be registered
# before we issue certificates.
if [[ $BUYPASS -eq 1 ]]; then
    CA_DIR="${ACME_DIR}/ca/api.buypass.com";

    if [[ ! -d "${CA_DIR}" ]]; then
        echo "${ECHO_PREFIX} Account email for BuyPass CA (required)?"
        read ACCOUNT_EMAIL

        eval "${ACME} --server https://api.buypass.com/acme/directory --register-account --accountemail '${ACCOUNT_EMAIL}'"
    fi
fi

# Create directory if it exists, make sure permissions are as strict as possible.
echo "${ECHO_PREFIX} Creating base certificate directory: ${BASE}"
mkdir -p $BASE
chmod -R 600 $BASE
chown -R root:root $BASE

echo "${ECHO_PREFIX} Name of folder containing certificates? (Will be created under ${BASE})"
read FOLDERNAME

echo "${ECHO_PREFIX} Creating folder if it doesn't exist: ${BASE}/${FOLDERNAME}"
mkdir -p "${BASE}/${FOLDERNAME}"

# ¯\_(ツ)_/¯ - https://timmurphy.org/2012/03/09/convert-a-delimited-string-into-an-array-in-bash/
OIFS=$IFS
IFS=' '

echo "${ECHO_PREFIX} Space-separated list of domains to generate a certificate for?"
read DOMAIN_LIST

DOMAINS=($DOMAIN_LIST)
IFS=$OIFS
DOMAIN_PARAMS=""
ACME_PARAMS=""

for (( i = 0; i < ${#DOMAINS[@]}; i++ )); do
    DOMAIN_PARAMS+=" -d ${DOMAINS[$i]}"
done

echo "${ECHO_PREFIX} DNS? [y/N]"
read IS_DNS

IS_DNS=${IS_DNS,,}
if [[ $IS_DNS == *"y"* ]]; then
    echo "${ECHO_PREFIX} DNS provider? For example: Cloudflare = dns_cf."
    echo "${ECHO_PREFIX} Provider also assumes the proper environment variables are set. Read: https://github.com/Neilpang/acme.sh/tree/master/dnsapi#how-to-use-dns-api"
    read DNS_PROVIDER

    ACME_PARAMS+="--dns ${DNS_PROVIDER}"
else
    echo "${ECHO_PREFIX} Webroot? For example: /var/www/html"
    read WEBROOT_DIR

    ACME_PARAMS+="-w ${WEBROOT_DIR}"
fi

# Make sure we point to the right CA.
if [[ $BUYPASS -eq 1 ]]; then
    ACME_PARAMS+=" --server https://api.buypass.com/acme/directory"
fi

echo "${ECHO_PREFIX} Reload command? For example: nginx -s reload"
read RELOADCMD

echo "${ECHO_PREFIX} Requesting certificate using the chosen methods:"
eval "${ACME} ${DOMAIN_PARAMS} ${ACME_PARAMS} --issue"

SSL_PATH="$BASE/$FOLDERNAME"
if [[ "$?" == "0" ]]; then
    echo "${ECHO_PREFIX} Certificate request completed. Installing certificate with reload command."
    eval "${ACME} ${DOMAIN_PARAMS} --key-file '${SSL_PATH}/key.pem' --fullchain-file '${SSL_PATH}/fullchain.pem' --cert-file '${SSL_PATH}/cert.pem' --reloadcmd '${RELOADCMD}' --install-cert"
else
    echo "${ECHO_PREFIX} An error occurred during certificate request. Aborting."
fi
Script for installing/prepping nginx
Prepping nginx
I use nginx for all my "in-house" applications, but also for other things.
This script is targeted towards Debian-based systems, as I usually rely on Ubuntu/Debian for server stuff.
This is a mirror of a GitHub Gist: https://gist.github.com/Decicus/2f09db5d30f4f24e39de3792bba75b72
The GitHub Gist link should be considered the "master copy". This wiki page is mainly for explaining the scripts and copies of said script/configs may be outdated.
A Git mirror can be found on my personal Gitea instance of said GitHub Gist, in case it ever goes down.
This prep script does the following:
- Downloads and installs
nginx, openssl, curl - Installs acme.sh for Let's Encrypt certificates
- Creates a directory for SSL certificates (
/srv/ssl) and sets the correct permissions to prevent other users from snooping. - Downloads a file for loading the
acme.shenvironment and Cloudflare API (DNS) variables, mainly to replace the automaticacme.shloading.- Cloudflare API information is used for utilizing the DNS API.
- Generally I have to manually remove the environment loader that
acme.shautomatically adds to bashrc/zshrc, so it's not "double". Haven't added anything to handle that for me yet.
- Downloads an nginx config for Let's Encrypt's webroot authentication.
- Points (via alias) all requests to
/.well-known/acme-challengeto a single directory/var/www/html/.well-known/acme-challenge
- Points (via alias) all requests to
- Downloads an nginx config for "good" TLS/SSL settings
- Settings are based on the "intermediate NGINX settings" from Mozilla's configuration generator
- An alternative is to check cipherli.st.
- Downloads an nginx config for PHP (7.4) FPM
- This isn't used in the base "virtualhost" config by default, as it's commented.
- Downloads a script to generate dhparams via OpenSSL
- Links to a base virtualhost config in the terminal :)
Files below were last updated April 30th, 2021. Check the GitHub Gist linked further up for updated script/configs.
setup.sh
The actual prep script, all links refer to the GitHub gist's "raw" URLs.
#!/bin/bash
# Make sure the 'essentials' are installed
sudo apt install -y nginx-full openssl curl

# Get acme.sh for issuing certificates
curl -L https://get.acme.sh/ | sudo bash

GIST="https://gist.github.com/Decicus/2f09db5d30f4f24e39de3792bba75b72/raw"
NGINX="/etc/nginx"
SSL_BASE="/srv/ssl"

# Create preferred base directory for storing SSL certificates
mkdir -p $SSL_BASE
chown -R root:root $SSL_BASE
chmod -R 600 $SSL_BASE

# Now the fun starts

# I have bash scripts that interact with acme.sh
# But I use zsh as the main shell
# Therefore I need a shared "environment file" that loads acme.sh
# And related environment variables
curl -L "$GIST/.acmeenv" > "$HOME/.acmeenv"

# Get the alias config for Let's Encrypt challenges:
curl -L "$GIST/letsencrypt.conf" > "$NGINX/letsencrypt.conf"

# Get the base SSL configuration
curl -L "$GIST/ssl_params.conf" > "$NGINX/ssl_params.conf"

# Get the PHP 7.4 FPM configuration (not enabled by default)
# You also need to install PHP before enabling it.
curl -L "$GIST/phpfpm.conf" > "$NGINX/phpfpm.conf"

# Get the dhparams file generation script, and execute.
curl -L "$GIST/generate-dhparams.sh" | sudo bash

# Add to ZSH/Bash config files
echo '. "$HOME/.acmeenv"' >> "$HOME/.zshrc";
echo '. "$HOME/.acmeenv"' >> "$HOME/.bashrc";

echo "Base setup done. Open this link for a base nginx site configuration: $GIST/000-default.conf"
000-default.conf
Base virtualhost config
server {
    listen 80 default_server;
    listen [::]:80 default_server;

    include letsencrypt.conf;

    server_name _;
    return 301 https://$host$request_uri;
}

server {
    listen 443 ssl http2;
    listen [::]:443 ssl http2;
    server_name _;
    root /var/www/html;

    ssl_certificate /srv/ssl/default/fullchain.pem;
    ssl_certificate_key /srv/ssl/default/key.pem;

    server_tokens off;

    include ssl_params.conf;
    include letsencrypt.conf;

    add_header X-Frame-Options "SAMEORIGIN";
    add_header X-XSS-Protection "1; mode=block";
    add_header X-Content-Type-Options "nosniff";
    add_header Strict-Transport-Security "max-age=63072000; includeSubDomains; preload";

    index index.nginx-debian.html index.html index.htm;

    charset utf-8;

    location / {
        try_files $uri $uri/ =404;
    }

    location /.well-known {
        auth_basic "off";
    }

    location = /favicon.ico { access_log off; log_not_found off; }
    location = /robots.txt  { access_log off; log_not_found off; }

    # Uncomment for PHP support (check /etc/nginx/phpfpm.conf), assumes PHP 7.2 FPM is installed.
    # include phpfpm.conf;

    access_log /var/log/nginx/default-access.log combined;
    error_log  /var/log/nginx/default-error.log error;

    location ~ /\.ht {
        deny all;
    }
}
generate-dhparams.sh
#!/bin/bash
sudo touch /etc/nginx/dhparams.pem
sudo chmod 700 /etc/nginx/dhparams.pem
# 4096 would also work here:
sudo openssl dhparam -out /etc/nginx/dhparams.pem 2048
letsencrypt.conf
location /.well-known/acme-challenge {
    alias /var/www/html/.well-known/acme-challenge;
}
phpfpm.conf
location ~ \.php$ {
    try_files $uri =404;
    fastcgi_split_path_info ^(.+\.php)(/.+)$;
    fastcgi_pass unix:/var/run/php/php7.4-fpm.sock;
    fastcgi_index index.php;
    include fastcgi_params;
    fastcgi_param SCRIPT_FILENAME $document_root/$fastcgi_script_name;
}
ssl_params.conf
ssl_protocols TLSv1.2 TLSv1.3;
ssl_ciphers ECDHE-ECDSA-AES128-GCM-SHA256:ECDHE-RSA-AES128-GCM-SHA256:ECDHE-ECDSA-AES256-GCM-SHA384:ECDHE-RSA-AES256-GCM-SHA384:ECDHE-ECDSA-CHACHA20-POLY1305:ECDHE-RSA-CHACHA20-POLY1305:DHE-RSA-AES128-GCM-SHA256:DHE-RSA-AES256-GCM-SHA384;
ssl_prefer_server_ciphers off;
ssl_dhparam /etc/nginx/dhparams.pem;
ssl_session_cache shared:SSL:10m;
ssl_session_timeout 1d;
ssl_session_tickets off;
.acmeenv
. "$HOME/.acme.sh/acme.sh.env"

export CF_Account_ID=""
export CF_Token=""
Hetzner - Using iGPU for Hardware Acceleration
Preface
A basic guide for enabling the internal GPU (iGPU) on Intel CPUs for Hetzner servers. Only tested on the machines with i7 CPUs.
This is loosely based off a reddit comment, with some changes to work with Ubuntu 18.04.
EDIT - December 21st, 2021: I've also followed my own guide for Debian 11, with an i7-8700k (on Hetzner). So it should work for Ubuntu 20.04 and Debian 10 as well. You might need to install some Intel drivers from apt (e.g. intel-media-va-driver), but I'm not entirely sure.
Grub
Remove hetzner's default grub config "nomodeset" which blocks loading of video card drivers. Open /etc/default/grub.d/hetzner.cfg, and comment out #GRUB_CMDLINE_LINUX_DEFAULT="nomodeset"
This file doesn't exist on Hetzner's Ubuntu 18.04 minimal image, so here are the correct steps.
-
sudo nano /etc/default/grub - Remove
nomodesetfromGRUB_CMDLINE_LINUX_DEFAULT- I don't recommend commenting the whole line out, since there might be other options supplied there. If there aren't, it should be safe to comment I guess.
-
sudo update-grubto update the bootloader.- Don't reboot yet.
Enabling drivers
Pretty much follow this as written:
Comment all line referencing i915 in this file.
sudo nano /etc/modprobe.d/blacklist-hetzner.conf
- Open
sudo nano /etc/modprobe.d/blacklist-hetzner.conf - Comment
blacklist i915andblacklist i915_bdwby adding a#in front:-
#blacklist i915 -
#blacklist i915_bdw
-
- Here's how my file looks like:
### Hetzner Online GmbH - installimage
### silence any onboard speaker
blacklist pcspkr
blacklist snd_pcsp
### i915 driver blacklisted due to various bugs
### especially in combination with nomodeset
#blacklist i915
#blacklist i915_bdw
### mei driver blacklisted due to serious bugs
blacklist mei
blacklist mei-me
blacklist sm750fb
Allowing Plex to use iGPU (non-Docker)
Add user emby (or plex) to the video group:
sudo usermod -a -G video emby
Doing it for Plex is practically the same.
-
sudo adduser plex videoorsudo usermod -aG video plex- You only need to use one of them.
Allowing Plex to use iGPU (Docker)
I recommend using LinuxServer's Docker image. Though with that said, I don't have any experience with it lol.
Docker Compose
With a docker-compose.yml file, add a devices: to your container config:
devices:
	- "/dev/dri:/dev/dri"
Here's an example config file with devices specified:
---
version: "2"
services:
  plex:
    image: linuxserver/plex
    container_name: plex
    network_mode: host
    devices:
      - "/dev/dri:/dev/dri"
    environment:
      - PUID=1000
      - PGID=1000
      - VERSION=docker
    volumes:
      - ./config:/config
      - /data/PlexMedia:/data/PlexMedia
    restart: unless-stopped
docker run (not recommended)
If you're running your Docker image manually (why?) then add --device=/dev/dri:/dev/dri as documented on LinuxServer's GitHub
Docker: VPN with Port Forwarding (WireGuard) & qBitTorrent
Sample Docker Compose configuration for running qBitTorrent as a container routed through another Mullvad container.
Note: In theory this should work with other VPN providers, but I have only tested it with Mullvad specifically. Port forwarding will only work if the VPN provider supports port forwarding, but torrenting might still work regardless.
Keep in mind that without port forwarding, you'll usually end up with less peers and thus downloads make take longer. You will also restrict the amount of peers you can upload (seed) to.
Update - June 2023
Mullvad is removing support for port forwarding. I'm keeping this page up for historical reasons (and I'll try to generalize places where I've named Mullvad directly), but keep in mind that you'll have to rely on other VPN providers that support port forwarding.
The /r/VPNTorrents subreddit had a thread for VPN recommendations that might be useful to those that are looking into alternatives. Subreddit has been banned, so an archive of the thread from March 2025 is linked.
I am personally using AirVPN. Feel free to use my referral link if you plan on using it as well :)
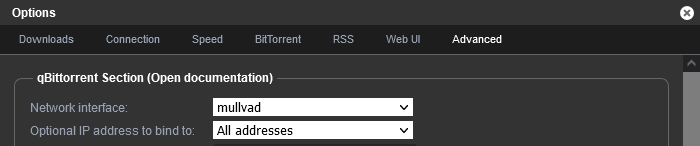
Port forwarding
For port forwarding to work, you have to set the "Listening port" (Settings -> Connection -> Listening port) in qBitTorrent to the correct forwarded port from your VPN provider.
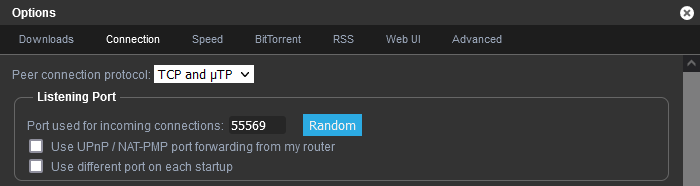
I also recommend forcing qBitTorrent to use the VPN network interface (Advanced -> Network interface), though I'm not sure if it matters much
docker-compose.yml file
services:
    vpn:
        container_name: wireguard
        image: jordanpotter/wireguard
        cap_add:
            - NET_ADMIN
            - SYS_MODULE
        sysctls:
            net.ipv4.conf.all.src_valid_mark: 1
            net.ipv6.conf.all.disable_ipv6: 0
        volumes:
            ### I use AirVPN, so first I have a "device": https://airvpn.org/devices/
            ### Then I make sure to open a port (with P2P support) via: https://airvpn.org/ports/
            ### For that generated port, I choose the device I created earlier.

            ### The WireGuard config is then generated via https://airvpn.org/generator/
            ### Select one of the servers closest to where you're hosting your qBitTorrent setup
            ### Download the .conf file, rename it to vpn.conf and put it in the same folder as the docker-compose.yml file.
            - ./vpn.conf:/etc/wireguard/vpn.conf
        ports:
            ### I run NGINX on the host server for a reverse proxy.
            ### The secondary `8080` matches the `WEBUI_PORT` on the qBitTorrent container configuration below.
            - "127.0.0.1:8888:8080"
        restart: unless-stopped

    ### Uses the LinuxServer.io image of qBitTorrent: https://github.com/linuxserver/docker-qbittorrent/pkgs/container/qbittorrent
    ### You might have to manually update it to 5.1.x, 5.2.x or even 6.x.x eventually.
    ### Keep in mind though that depending on how recent those versions are, they may not be compatible with some private trackers.
    ### Some private trackers have a torrent client whitelist, so while 5.1.x might be whitelisted now, it might be smart to hold off for a few days when 5.2.x or 6.x.x gets released.
    qbittorrent:
        container_name: qbittorrent
        image: ghcr.io/linuxserver/qbittorrent:5.1.2
        restart: unless-stopped
        depends_on:
            - vpn
        ### The `network_mode` line is important. It will force all networking to go through the VPN container. Works as a killswitch should the VPN connection drop.
        network_mode: "service:vpn"
        volumes:
            ### This holds the qBitTorrent configuration. If you want, you could rely on Docker volumes instead. I prefer have it all in the same directory as my Docker Compose yml files.
            - ./config:/config
            ### /data is where I point my downloads towards, you might use /mnt - or something else. Up to you!
            - /data:/data
        environment:
            ### For permissions, you might have to adjust this depending on your user or group ID in Linux.
            ### You can use `id your-username-here` on the server/system you're running Docker to figure out what user ID (uid) and group ID (gid) you wanna use.
            # - PUID=112
            # - PGID=114
            ### Depending on where you live, you might want to change the line below. Europe/Oslo should work for anyone in Central European Time though :)
            - TZ=Europe/Oslo
            - WEBUI_PORT=8080
NGINX configuration file
### This is loosely based on the following:
### qBitTorrent GitHub wiki: https://github.com/qbittorrent/qBittorrent/wiki/NGINX-Reverse-Proxy-for-Web-UI
### My personal NGINX bootstrapping script: https://gist.github.com/Decicus/2f09db5d30f4f24e39de3792bba75b72
### Someone's reddit comment while I was researching, I wish I could find it again...

### Comments that are prefixed with 3 hashtags (such as this one), should not be uncommented. Otherwise they will break the NGINX config.

server {
    listen 443 ssl http2;
    listen [::]:443 ssl http2;
    server_name qbittorrent.example.com;
    root /var/www/html;

    ssl_certificate /srv/ssl/qbittorrent/fullchain.pem;
    ssl_certificate_key /srv/ssl/qbittorrent/key.pem;

    server_tokens off;

    ### These files are included as part of my NGINX bootstrapping script: https://gist.github.com/Decicus/2f09db5d30f4f24e39de3792bba75b72
    ### So normally I'd just put `include ssl_params.conf` and call it a day.
    ssl_protocols TLSv1.2 TLSv1.3;
    ssl_ciphers ECDHE-ECDSA-AES128-GCM-SHA256:ECDHE-RSA-AES128-GCM-SHA256:ECDHE-ECDSA-AES256-GCM-SHA384:ECDHE-RSA-AES256-GCM-SHA384:ECDHE-ECDSA-CHACHA20-POLY1305:ECDHE-RSA-CHACHA20-POLY1305:DHE-RSA-AES128-GCM-SHA256:DHE-RSA-AES256-GCM-SHA384;
    ssl_prefer_server_ciphers off;

    ### dhparams will have to be created here
    ### See this script file: https://gist.github.com/Decicus/2f09db5d30f4f24e39de3792bba75b72#file-generate-dhparams-sh
    ssl_dhparam /etc/nginx/dhparams.pem;
    ssl_session_cache builtin:1000 shared:SSL:10m;
    ssl_session_timeout 1d;
    ssl_session_tickets off;

    add_header X-Frame-Options "SAMEORIGIN";
    add_header X-XSS-Protection "1; mode=block";
    add_header X-Content-Type-Options "nosniff";
    add_header Strict-Transport-Security "max-age=63072000; includeSubDomains; preload";

    ### CSP that whitelists a userstyle I use in my browser, for the qBitTorrent web UI: https://docs.theme-park.dev/themes/qbittorrent/
    ### Might wanna tweak it to your own liking if you don't use it.
    ### Commented by default, because it generally causes more headaches than it helps...
    # add_header Content-Security-Policy "default-src https://use.fontawesome.com https: moz-extension: 'self' 'unsafe-inline'; style-src https://gilbn.github.io https://theme-park.dev https://qbittorrent.example.com https://raw.githubusercontent.com https://use.fontawesome.com 'unsafe-inline'; img-src https:";

    index index.nginx-debian.html index.html index.htm;

    charset utf-8;

    location / {
        ### Only IP-based whitelisting. I whitelist my home IP, but you can choose to use something like HTTP auth if you want.
        ### Some might also be fine with exposing qBitTorrent's login page directly. If so, leave this commented.
        # allow 127.0.0.1;
        # allow 192.168.0.0/24;
        # deny all;

        ### If you want to use a mixture of IP address whitelisting, with fallback to HTTP authentication where the IP whitelist fails, you can uncomment the section below.
        ### This would allow you to access qBitTorrent on other networks (e.g. when traveling), but still add an extra layer of protection besides the qBitTorrent's web UI authentication.
        # satisfy any;
        # allow 127.0.0.1;
        # allow 192.168.0.0/24;
        ### On Debian or Ubuntu, you can install the `apache2-utils` package via apt: `apt install apache2-utils`
        ### Which will allow you to run: `htpasswd -c /etc/nginx/.htpasswd-qbittorrent the-username-you-want-to-use-here`
        ### The command above will prompt for password, unless you specify it after the username in the command itself.
        ### Note that with HTTP authentication, *both* the username and password are case sensitive.
        # auth_basic "Restricted Area";
        # auth_basic_user_file /etc/nginx/.htpasswd-qbittorrent;
        ### Don't forget to uncomment this line if you use the HTTP auth + IP whitelist mix above.
        # deny all;

        ### Make sure the `8888` port here matches the first port in the docker-compose.yml file
        ### E.g. if your "ports" line has: "127.0.0.1:8123:8080", you would put: `proxy_pass http://127.0.0.1:8123;`
        proxy_pass http://127.0.0.1:8888;
        proxy_http_version 1.1;

        ### The `8080` port here has to match the one in the `WEBUI_PORT` in docker-compose.yml
        ### Or else you will have issues...
        proxy_set_header   Host               127.0.0.1:8080;
        proxy_set_header   X-Forwarded-Proto  $scheme;
        proxy_set_header   X-Forwarded-Host   $http_host;
        proxy_set_header   X-Forwarded-For    $remote_addr;
        proxy_set_header   X-Real-IP          $remote_addr;
        proxy_hide_header  Content-Security-Policy;

        ### Optionally, you can adjust the POST request size limit, to allow adding a lot of torrents at once
        ### 100M might be a bit overkill, but for large torrents with tons of files,
        ### you'll likely run into problems if you choose not to adjust this at all.
        client_max_body_size 100M;

        ### since v4.2.2, is possible to configure qBittorrent
        ### to set the "Secure" flag for the session cookie automatically.
        ### However, that option does nothing unless using qBittorrent's built-in HTTPS functionality.
        ### For this use case, where qBittorrent itself is using plain HTTP
        ### (and regardless of whether or not the external website uses HTTPS),
        ### the flag must be set here, in the proxy configuration itself:
        proxy_cookie_path / "/; Secure";
    }

    location /.well-known {
        auth_basic "off";
    }

    location = /favicon.ico { access_log off; log_not_found off; }
    location = /robots.txt  { access_log off; log_not_found off; }

    access_log /var/log/nginx/qbittorrent-access.log combined;
    error_log  /var/log/nginx/qbittorrent-error.log error;

    location ~ /\.ht {
        deny all;
    }
}
HostHatch: Private Networking and Broken IPv6
Thanks to brueggus on LowEndTalk for pointing this out and giving the solution.
If you have private networking enabled on a HostHatch VPS and your IPv6 connectivity is broken, it might be because of the lack of isolation between customers. The result is that someone can send IPv6 router advertisements via the private network and cause issues.
The fix relies on the fact that you have IPv6 manually configured on your VPS to access the public internet over IPv6, so make sure you have that as well.
- Add
net.ipv6.conf.eth1.accept_ra=0to/etc/sysctl.conf- Make sure that
eth1matches the interface for your private network. Check usingip aand see what interface the10.0.0.0/8address on your VPS uses.- Typically
eth1= private network, whileeth0= public network. Though you might have something likeenp0s3or similar.
- Typically
-
echo 'net.ipv6.conf.eth1.accept_ra=0' >> /etc/sysctl.conf
- Make sure that
- Run
sysctl -pto apply the changes to/etc/sysctl.conf - Test IPv6 connectivity using something like curl:
curl -6 -v https://icanhazip.com/
Supermicro IPMI & Samba/Windows share
Special thanks to Peter Kieser, whose blog post I found after a bit of searching: https://peterkieser.com/2020/05/14/supermicro-ipmi-virtual-media-and-samba-4-11-ubuntu-20-04/
For most modern installations of Samba (according to the blog post, Samba 4.11+ on Ubuntu 20.04), you need to manually set NT1 as a supported protocol in /etc/samba/smbd.conf - Make sure it's under the [global] section:
[global]
server min protocol = NT1
Run systemctl restart smbd for good measure and try to connect again.
I had to set guest ok = yes under my share settings as well and get rid of username/password in the IPMI input fields, but maybe that was unrelated:
[shares]
    path = /data/shares
    public = yes
    guest ok = yes
    read only = yes
MinIO Server - Docker Compose & NGINX reverse proxy
My basic example for a MinIO server.
⚠️ I'm leaving this up for historical reasons, but might be out of date as I am no longer relying on MinIO ⚠️
Docker Compose
version: '3'

services:
    minio:
        image: minio/minio:latest
        volumes:
            - /data/my-fancy-local-storage:/data
        ports:
        	# I use an NGINX reverse proxy, so these ports are only exposed
            # to the loopback adapter on the host server.
            - "127.0.0.1:9000:9000"
            - "127.0.0.1:9001:9001"
        environment:
            MINIO_ROOT_USER: <REDACTED>
            MINIO_ROOT_PASSWORD: <REDACTED>
            MINIO_SERVER_URL: https://s3.example.com
            MINIO_BROWSER_REDIRECT_URL: https://s3-manage.example.com
            MINIO_DOMAIN: s3.example.com
        command: server --console-address :9001 /data
        healthcheck:
            test: ["CMD", "curl", "-f", "http://minio:9000/minio/health/live"]
            interval: 1m30s
            timeout: 20s
            retries: 3
            start_period: 3m
        restart: unless-stopped
NGINX - Management console
Slightly tweaked as I use a lot of alias configs. This variant is conslidated into a singular configuration.
server {
    listen 443 ssl http2;
    listen [::]:443 ssl http2;
    server_name s3-manage.example.com;
    root /var/www/html;

    ssl_certificate /srv/ssl/minio/fullchain.pem;
    ssl_certificate_key /srv/ssl/minio/key.pem;

    server_tokens off;

    ssl_protocols TLSv1.2 TLSv1.3;
    ssl_ciphers ECDHE-ECDSA-AES128-GCM-SHA256:ECDHE-RSA-AES128-GCM-SHA256:ECDHE-ECDSA-AES256-GCM-SHA384:ECDHE-RSA-AES256-GCM-SHA384:ECDHE-ECDSA-CHACHA20-POLY1305:ECDHE-RSA-CHACHA20-POLY1305:DHE-RSA-AES128-GCM-SHA256:DHE-RSA-AES256-GCM-SHA384;
    ssl_prefer_server_ciphers off;
    # You'll have to generate DH Parameters yourself
    ssl_dhparam /etc/nginx/dhparams.pem;
    ssl_session_cache shared:SSL:10m;
    ssl_session_timeout 1d;
    ssl_session_tickets off;

    add_header X-Frame-Options "SAMEORIGIN";
    add_header X-XSS-Protection "1; mode=block";
    add_header X-Content-Type-Options "nosniff";

    # To allow special characters in headers
    ignore_invalid_headers off;
    # Allow any size file to be uploaded.
    # Set to a value such as 1000m; to restrict file size to a specific value
    client_max_body_size 0;
    # To disable buffering
    proxy_buffering off;

    add_header Strict-Transport-Security "max-age=63072000; preload";

    index index.html index.htm;

    charset utf-8;

    location / {
        satisfy any;
        # For whitelisting IPs
        allow 127.0.0.1;
        deny all;

        # auth_basic "Restricted Access";
        # auth_basic_user_file /etc/nginx/.htpasswd-minio;

        proxy_pass http://127.0.0.1:9001;
        proxy_set_header Host $http_host;
        proxy_set_header X-Real-IP $remote_addr;
        proxy_set_header X-Forwarded-For $proxy_add_x_forwarded_for;
        proxy_set_header X-Forwarded-Proto $scheme;

        proxy_connect_timeout 300;
        # Default is HTTP/1, keepalive is only enabled in HTTP/1.1
        proxy_http_version 1.1;
        proxy_set_header Connection "";
        chunked_transfer_encoding off;
    }

    location /ws {
        satisfy any;
        # For whitelisting IPs
        allow 127.0.0.1;
        deny all;

        proxy_pass http://127.0.0.1:9001;

        proxy_http_version 1.1;
        proxy_set_header Upgrade $http_upgrade;
        proxy_set_header Connection "Upgrade";
        proxy_set_header Host $http_host;
        proxy_set_header X-Real-IP $remote_addr;
        chunked_transfer_encoding off;
    }

    location = /favicon.ico { access_log off; log_not_found off; }
    location = /robots.txt  { access_log off; log_not_found off; }

    access_log /var/log/nginx/s3-manage.example.com-access.log combined;
    error_log  /var/log/nginx/s3-manage.example.com-error.log error;

    location ~ /\.ht {
        deny all;
    }
}
NGINX - For uploads/downloads
server {
    listen 443 ssl http2;
    listen [::]:443 ssl http2;
    # The leading period here is important to support virtualhost style vs. path style
    # E.g. `bucket-name.s3.example.com` instead of `s3.example.com/bucket-name`
    server_name .s3.example.com;
    root /var/www/html;

    ssl_certificate /srv/ssl/minio/fullchain.pem;
    ssl_certificate_key /srv/ssl/minio/key.pem;

    server_tokens off;

    ssl_protocols TLSv1.2 TLSv1.3;
    ssl_ciphers ECDHE-ECDSA-AES128-GCM-SHA256:ECDHE-RSA-AES128-GCM-SHA256:ECDHE-ECDSA-AES256-GCM-SHA384:ECDHE-RSA-AES256-GCM-SHA384:ECDHE-ECDSA-CHACHA20-POLY1305:ECDHE-RSA-CHACHA20-POLY1305:DHE-RSA-AES128-GCM-SHA256:DHE-RSA-AES256-GCM-SHA384;
    ssl_prefer_server_ciphers off;
    # You'll have to generate DH Parameters yourself
    ssl_dhparam /etc/nginx/dhparams.pem;
    ssl_session_cache shared:SSL:10m;
    ssl_session_timeout 1d;
    ssl_session_tickets off;

    add_header X-Frame-Options "SAMEORIGIN";
    add_header X-XSS-Protection "1; mode=block";
    add_header X-Content-Type-Options "nosniff";

    # To allow special characters in headers
    ignore_invalid_headers off;
    # Allow any size file to be uploaded.
    # Set to a value such as 1000m; to restrict file size to a specific value
    client_max_body_size 0;
    # To disable buffering
    proxy_buffering off;

    add_header Strict-Transport-Security "max-age=63072000; preload";

    index index.html index.htm;

    charset utf-8;

    location / {
        proxy_set_header Host $http_host;
        proxy_set_header X-Real-IP $remote_addr;
        proxy_set_header X-Forwarded-For $proxy_add_x_forwarded_for;
        proxy_set_header X-Forwarded-Proto $scheme;

        proxy_connect_timeout 300;
        # Default is HTTP/1, keepalive is only enabled in HTTP/1.1
        proxy_http_version 1.1;
        proxy_set_header Connection "";
        chunked_transfer_encoding off;

        proxy_pass http://127.0.0.1:9000;
    }

    location = /favicon.ico { access_log off; log_not_found off; }
    location = /robots.txt  { access_log off; log_not_found off; }

    access_log /var/log/nginx/s3.example.com-access.log combined;
    error_log  /var/log/nginx/s3.example.com-error.log error;

    location ~ /\.ht {
        deny all;
    }
}
Software RAID (mdadm) - Running RAID 0 alongside RAID 1
Draft - Incomplete, but kept mostly for my own sake so I can find my way back to it at a later date.
- Specific scenario: Hetzner installimage with RAID1 or RAID10
- RAID10 with less storage for the OS and "important" stuff.
- Make sure to comment out the
alloption, that allocates the rest of the disks to say/homeor similar.
- Make sure to comment out the
- RAID0 with the remaining storage across all 4 of the disks (Linux ISOs) that's easily replacable.
- Create empty partitions using
fdisk. Ended up with:/dev/sda5,/dev/sdb5etc.-
fdisk /dev/sda-
n(new partition)- Note the partition number. For me the last partition number ended up being
5for all disks, which I used in themdadmcommand later.
- Note the partition number. For me the last partition number ended up being
- Select start block, end block etc. (or just leave default to use remaining space)
-
wto write partition table
-
-
- Create a new RAID0 array using new partitions, with
mdadm:-
mdadm --create --verbose /dev/md3 --level=0 --raid-devices=4 /dev/sda5 /dev/sdb5 /dev/sdc5 /dev/sdd5 - Note: Might wanna check
lsblkto verify that/dev/md3isn't already taken. When I raninstallimageI ended up with:-
md0= swap -
md1= boot -
md2= root partition (/)
-
-
- Run
mdadm --detail --scanand find the line that matches/dev/md3. Copy that line and put it at the end of/etc/mdadm/mdadm.conf- A lot of tutorials suggest piping that to
tee -a /etc/mdadm/mdadm.confso it appends all the lines to the end of/etc/mdadm/mdadm.conf. In this case since there's already an existing RAID array, there will be duplicate lines and potential for conflicts.
- A lot of tutorials suggest piping that to
- Double check that
/etc/mdadm/mdadm.conflooks correct, then runupdate-initramfs -uso that the RAID array is available during the boot process.
- TODO: Creating filesystem, mounting, append to fstab.
Gameservers
Garry's Mod - INFRA Content
Mounting INFRA content on a Garry's Mod server
- Log in using SteamCMD with your credentials (you need to own INFRA on your account)
- Start
steamcmdvia command line. - Type:
login YOUR_USERNAME_HERE - Type in password and 2FA code.
- Start
- Set install directory using
force_install_dir- Example on Linux:
force_install_dir /home/alex/my_gmod_server/infrafiles - Example on Windows:
force_install_dir C:/my_gmod_server/infrafiles
- Example on Linux:
- Make sure to set the correct platform type for SteamCMD:
@sSteamCmdForcePlatformType windows- This is only necessary for Linux, but doesn't affect anything on Windows.
- Download INFRA files:
app_update 251110 validate-
validateat the end is optional, but I recommend using it to validate your downloaded files.
-
- Open up your
mount.cfgfile (using a text editor like Notepad++ or similar) inside yourgarrysmod/cfgdirectory- In my case (Linux), the full directory would be
/home/alex/my_gmod_server/garrysmod/cfg/mount.cfg - Or on Windows:
C:/my_gmod_server/garrysmod/cfg/mount.cfg
- In my case (Linux), the full directory would be
- Add a line inside the "squiggly brackets" (they look like this:
{}) and put:- Linux:
"infr" "/home/alex/my_gmod_server/infrafiles" - Windows:
"infr" "C:\my_gmod_server\infrafiles" - I added an example
mount.cfgdown below.
- Linux:
- Restart the server.
mount.cfg (example)
//
// Use this file to mount additional paths to the filesystem
// DO NOT add a slash to the end of the filename
//

"mountcfg"
{
	// "cstrike"	"C:\steamcmd\steamapps\common\Counter-Strike Source Dedicated Server\cstrike"
	// "tf"			"C:\mytf2server\tf"
	"infr"          "/home/alex/my_gmod_server/infrafiles"
}
steamcmd_example_script.sh
#!/bin/bash

# Example bash script for downloading INFRA content on a Linux server.
USERNAME="decicus"
INSTALL_DIRECTORY="/home/alex/my_gmod_server/infrafiles"

./steamcmd +login $USERNAME +force_install_dir $INSTALL_DIRECTORY +app_update 251110 validate +quit